Saturday, September 9, 2023


Friday, September 8, 2023
Tuesday, September 5, 2023
"A picture is worth . . ."
Coming up next ~
I am creating a template for you to copy and paste. You can use it to understand the geometry of crochet and perhaps chart your own patterns.
The only software you need is the "Graph Paper Printer" by Dr. Philippe Marquis. It is free.
That software will get you paper to draw on, free hand. I use the polar grid, and sheet music paper.
If you want to use computer-assisted drawing programs, I use Affinity. It is less expensive and easier to use than Adobe Illustrator.
Wednesday, August 23, 2023
Lemonade !

The Fashion Show
Before I started this series of posts I took a lesson, or two, from
Jane Snedden Peever,
https://www.jspcreate.com
"They" say a good teacher is one who inspires.
The above circles are wine cozies. I drink wine, with ice. The condensation
on the stemware glass - even the plastic ones - would drip on my clothing.
And since I was already playing with crochet, I solved my problem by
making wine cozies.

The thing about a TBI is, you think you can do things,
and discover that skill is gone . . .
So you have to figure out a way to make your ideas work.
Anyone can do anything with mindful effort,
and a willingness to keep at it.
Never feel sorry for a 'disabled' person.
Instead, rejoice with them in their accomplishments,
However small, in your world.
In their world, it is HUGE!
So this post is about mistakes. . .
and how to live with them.
If mistakes are not 'your thing' - skip this and go directly to the previous post.

While practicing making centers, I made this. But,
I need one more SC to make a center that can be
divided by 4.
In the next row, "SC2 in ea. st."
I must make 3 additional stitches:
1 for this row
and 2 for the next row.
I learned that by trial and Error!!

It started ok, but in the orange row, I have 17 DCs.
So, using the same color, I added what I thought would be
the correct number of stitches.
Wrong again!
While it will never be a square,
I can use it as a circle.

Monday, August 21, 2023
Start row with a Double Crochet
When can you use a DC without a CH3 beginning? At the start
of the row with a new color.
You
cannot use it to start a row within a ‘magic ring’ –
but you can make a magic ring, do a row of SC then start the
next row with
DCwoCH3 = Double crochet without
chain 3.

Do NOT make a slip stitch.


double crochet.
Note: the hook is held
vertical for clarity,
but make the stitch with
the hook at right angles
to the work.

Work the round as you normally would,
but do not count the first long loop
as a stitch.
At the end of the row, work the first
double crochet
(Or DC+CH1) as the last stitch.

Put a stitch holder in the last stitch
made (black pin) and one
at the top of the first DC (brass pin).
Pull out the loose end of the loop
until all that remains is the DC.


Join with an invisible join.

Completed pattern row.
With deep appreciation to Jane at JSP Creates.
Next up:
Lagniappe
Pronounced Lan-yap
Meaning
Bonus Material
Sunday, August 20, 2023
Crochet Olé
Lay the groundwork for a pattern:
I want my polygon to have 4 sides,
but I like each side to have an odd number of stitches:
start, center, and end.
I will start with a ‘magic circle’ and SC5.
I put a pin in
the last SC made.
Instead of a join, my circle is small, so I choose to make a
spiral instead of a join, continuing the spiral until there are 10 stitches to
my circle.
I could have started with 10 stitches
in the ‘magic ring’,
but it squeezes up better with only
5.
This is where the pin marking
the end of the first row is important.
I could start my square with only 5 stitches in between the
corner but that looks a little cramped.
I decided that 10 stitches give me more to play with, for a
total of 44* stitches. That leaves 11 stitches on each side. Now I can make up a
pattern of 11 stitches.

This is my center. It
should count 10 single crochets.
I use a black pin to
mark last stitch and gold for first stitch. Or vice versa.
Be consistent and
you won’t have to remember. It will become habit.
Row 2: SC2 in each stitch. 20 total.
At this point, I need 24 more stitches. I could keep
increasing by 10, then 4. Will an increase of 4 stitches keep my piece flat? Two
more rows of stitches will begin to make my piece too large to have any kind of
creative stitch pattern and still keep it under 4 inches.
Row 3: *SC2 in each stitch x 9, 3 SC in next st. *Repeat to
end. 44 stitches.
If I want
4 sides, but an odd number on each side, I must have a base of a multiple of 4
plus 1, or in this case (4 sides) a multiple of 4 plus 4.
44/4=11
Correction!
Do not count the corners! So I needed 40 stitches.
Each side has a corner and 9 pattern stitches.
The Bonus Material in which I illustrate mistakes
will appear after the Double Crochet
without a Chain 3 in Part 3 of 3.
However, you want a straight side.
That means the increases come in the corners.

How did I know I wanted to make a
spiral instead of a join? A ‘magic ring’
instead of chains?
I made five centers and chose the one I liked
best.
Yes, it is that easy.
Keep it under 20 (fingers and toes)
and math is easy too.
At the end of Row 2, I had 30 stitches. 30 cannot be divided by 4 and come
out even.
30/4 = 7 + 2/4
If I want 7 sections I must subtract 2, and if I want 8 sections I must
add 2.
Hmmm – does that work with, for
example, 15/7 ? 15/7 = 2 + 1/7
Can I add 1 to 15 and get something
that will divide by 7 ?
NOPE! But if I increase by 1 stitch,
I can divide by 4 !
So, what else works?
15 minus 1 = 14, which can be
divided evenly. If I want to divide 15 evenly by 4,
I must add 1 or 5 (which is the sum
of 4 plus 1)
This proves the point, you don’t have to find your way out of a maze to solve a problem.
Another option is to start with a multiple of
4, and when I reach a pattern row, increase by 1 + plus the increases needed to
go around the block.
Why does something ‘work’ with knitting or crochet that won’t
work with a woven piece?
Look at your yarn. It is one strand of yarn (most times). Now look at your stitch.
It makes a loop. That loop comes out, goes around and goes back down. That makes 3 layers of one strand. That loop means that your finished piece will stretch or compact. Knitting is stretchier than crochet. It is the nature of the beast. When we want to make
a stretchy fabric out of woven material, we over-spin the yarn, and that makes it crinkle up. We call the fabric ‘crepe.’ Think of a ruffled crepe myrtle bloom or skin with many lines: There are hills and valleys in that skin. It has lost its stretch, but the skin is still there.
We are almost to the most interesting part.
But first, I need to know how many stitches to increase
in each row to keep my circle/square flat.
Let’s look at the classic Granny Square:

Row 1: Set up of ring and work CH3, DC2, CH3, *DC3, CH3. *to end.
12 stitches and 4 ‘chain-3-spaces’. Join
Row 2: CH3, DC2, CH2, DC3, CH3, *DC3, CH2, DC3, CH3. *to end. Join.

.At this point it isn't necessary to count stitches.
If the pattern is 'off' you will see it.
Next up . . .
The DC Row without Chain 3 to start !
Friday, August 18, 2023
Crochet, Old and New
Everyone has that special teacher. Mine is Jane at JSP Creates.
Review:
This is for people who already have a working knowledge of crochet but may need some review.
Make one stitch on either side of each stitch,
*which may be a ‘chain stitch space’.
The top of a stitch lies between stitches.

If you have a row of DC+ch1, there will be 2 stitches in each space. This means that for each DC+ch1 (2 stitches) you now have 3 stitches: the DC of the previous row, plus 2 stitches (one on either side).

Tan Row: 2DC in each space.

Note that the first tan DC is created with
1 long chain
instead of a ch3.
In the gray row, can you find the ch3
that normally starts a DC row?
(You won’t find it because it isn’t
there.)
Striped circles are great for learning the basics, but in
time I need more of a challenge. To add variety to your piece:
1. Combine stitches with spaces.
2. Use a variety of stitches. Be aware that
different stitches will have different heights.
a.
A slip stitch adds no height nor width (in
theory).
b.
A chain stitch adds little height, but some
width.
c.
A single crochet adds a little more height and
width.
d.
A double crochet adds more height, not more
width.
e.
A triple crochet adds yet more height, not more
width.
f.
A multiple of double crochet in one space adds
width, not more height than a single double crochet.
g.
A cluster of double crochet can add height and
width but covers the area of one stitch at the top and bottom.
3.
Combine items #1 and #2 to create a ‘pattern.’ A 'stitch, ch 3, stitch' in a single stitch or space will create a corner, changing the
circle into a polygon.
By starting with a small circle (that will become a 3” or 4”
square) you can resort to ‘trial and error.’ If you don’t like the look of what
you just did, it is easy to rip out and try something else.
“Start with the
End in Mind”
One of Stephen Covey’s
7 Habits of Effective People
“Every step you take,
every stitch you make” – no one is watching you. Do what pleases you.
A bad start almost never ends well .
. .
The key here is "almost" .
To be continued.
Post Script:
Something to remember when learning a new technique: focus
on one thing at a time. The first time you work it, the quality of the
stitches may be wonky. That’s OK. Designers don’t publish first drafts. Tackle
only one thing at a time. A photographer may take 1,000 photos to get that one ‘great
shot’.
With that in
mind, be aware that I am recovering and re-learning after a traumatic brain
injury. Before the incident, eight years ago, I was a professional designer/writer
and illustrator. As a freelancer, I had to learn many different disciplines. Retired now, I provide this information for free and hope it is shared. There are mistakes in my work - I do that to see who is paying attention. (I wish). Actually, I love mistakes. We learn more from our mistakes than we do from our successes.
If my work
doesn’t look as wonderful as that of designers who are publishing patterns, it
may be because this is a journal, of a journey to recovery. I don’t work
on any one discipline long enough to develop mastery. There may be months
between posts. It happens that way.
Thursday, June 22, 2023
Counted Thread Embroidery on a Journey to Crochet
I am skipping over the several months of counted thread embroidery to adventures in crochet. More to follow.
In the following posts, I combine the counted thread embroidery with crochet on linen - it is certainly a counted thread technique - worked on a ground that is not so much counted, except as counted by the ruler.
Meanwhile - watch this space. More to come.
Sunday, December 18, 2022
Stress Free Stitching
I turn my attention to counted thread embroidery in these latter days of the year.
Sometimes we need an intense challenge, but the holidays have their own challenges. We don't need more. But neither do we want boredom. Rather, our souls seek a comfortable balance. Winter, in general, can be stressful with bone-chilling weather, and light deprivation.
Blackwork, also known as Holbein embroidery, after the 17th-century portrait artist in the court of Henry VIII is a favorite of mine. Others are pulled thread embroidery and Hardanger. Almost any embroidery stitch can be worked over a set number of threads.
From the book Blackwork & Holbein Embroidery, book 2, by Ilse Alrherr (self-published), this pattern has been modified. The book is out-of-print. Attempts to contact the author for permission to reproduce part of her pattern were fruitless. The modification makes the border narrower and required a re-design of the corner motif to compensate for the change.

In my long life, I have observed that trends in the fiber arts market turn to the predictability of counted thread work when the social climate and world politics are uncertain and unstable. The year 2022, coming hard on the Covid 19 pandemic and disputed political outcomes have been unsettled with little to suggest an impending change.
I have worked on several of the patterns in my books by Altherr, and consider her a master of historical hand embroidery. I took a class from her in the 1980s in Mobile, Alabama through the local Embroiderers' Guild. I chose this pattern for a specific piece of fabric that I wanted to use as a table centerpiece and worked it in ecru pearl cotton on Hardanger cloth.
Friday, November 11, 2022
A.B.C.s of 1 x 1 Cables
Bromefields Knitting Shop on Etsy
Cables -
cars, telegrams, landline telephones, lifelines, internet, KNIT !
Who doesn't love cables?
What follows here are my observations while learning to knit cables. Listed above are some excellent sources for those interested in furthering their cable knitting education. As always, nothing on my page is a 'paid advertisement.'
- The first listed is an inexpensive booklet on some traditional cable variations.
- Norah Gaughan presents a comprehensive study of cables.
- Melissa Leapman presents her class on working cables as an icon, instead of a vertical row.


Wednesday, November 9, 2022
Crochet Cotton vs. Knitting Cotton Yarn
What's the difference?
Consider the crochet "doilies" popular in Victorian decor. That trend lasted well into the 20th century and is still revered by some.
The crocheted doily was a knock-off of historic laces, that had been practiced for centuries but required skill and specialization. To this day, crochet is considered a 'lesser ' needle art in some quarters. Not this one.
Lacis, a favorite of Mary, Queen of Scots is, in my experience the most difficult of all the lace techniques. It requires the lacemaker to first knot a net as a base. Then to embellish the net, she or he enters the net with the needle at one point and weaves. If the lace has been executed correctly, the needle will emerge at the same place it entered the net when the weaving is finished. 'Net weaving' is a less complex version of Lacis and is often done on a commercially made net.
In crochet, the 'look' was accomplished by the technique "Filet Crochet," wherein the embellishment and the netting was created at the same time, row by row.
Knitting is a different discipline altogether. While lace can be knitted, not all knitting is lace. The same could be said of crochet, however, so what is the difference?
Crochet was popular for home decor, back in the day. It was washed often and must withstand chlorine bleach, or harsh sunlight. Knitting was most often done in wool, but we are discussing cotton here - so what about knitting? Both crochet and knitted items are popular today.
Using crochet cotton for either knitting or crochet means using a more firmly spun thread, while cotton prepared for knitting is often softer. It is up to the user which they prefer.
Color Coding Your Chart
I love color coding. I got my first BIG commission for introducing a color-coded filing system to Boeing in the 1960s. It was for the 737. Don't blame me, it was only the files.
To move on, I have had a lifetime of experience with color - and coding - and color coding.
Today I am applying the principles to 'Knitted Cables.'
Fortunately, the color wheel has more than 3 primary colors: Red, Blue, or Yellow.
We get to use secondary, or even tertiary colors.
To make it even more fun - we will distinguish between warm and cool colors. And light and dark colors! What a festive array!
Secondary colors are what you get when you mix two primary colors: Purple, green, or orange.
By now you may have noticed that some colors are easier to see if they are darker. For example, 'orange' has been made 'brown' so it can be seen easily. (I have not shown yellow at all, except - see below) !
But, if I put any color within a black outline, it is seen much more quickly. Even white will show up if it has a boundary of black - as in:

Notice that yellow and black have the most contrast. That is because yellow is a warm color, while black, like white, is neutral. Grey without an outline, almost disappears from the page. Also, scientifically, black is either all colors or no colors, (I forget which) and white is the opposite, but black is dark and shows up well.
Typographers will use those features of colors to give their message an impact. But everyone enjoys color - as witnessed by movies and tv producers.
Given that yellow, and its neighbors, red and orange, are warm colors and appear to come forward if I am illustrating a stitch that comes forward I will use a warm color.
Likewise, a stitch that lies behind a stitch that comes forward gets grey, outlined in black. Because it is behind - and harder to see.
That takes care of 'knit' and 'purl' - but what if your cable is ' knit - knit' or 'purl knit' ? Or 'knit - purl - knit'?
That is when we use tertiary colors and values.
Tertiary colors happen when you mix two secondary colors, or a secondary color and a primary color.
They will show up as 'lavender-blue' or 'red-violet'.
The Value is seen as the lightness or darkness of a color. Such as 'red' vs. 'pink', or black vs. white.
So we have a whole array of colors, and values and temperature to record our data. And that doesn't even touch on texture. Y'all know what texture is - all touchy/feely.
Wednesday, November 2, 2022
When vision fails . . .
If we are lucky, we are blind from birth and can learn to see in other ways, from birth.
If we are lucky, we lose our vision gradually and can find ways to compensate.
If we are lucky, we lose our vision suddenly but have had a lifetime of seeing.
Either way, we are fortunate and will find a solution.
Here I will share mine, for knitting patterns . . .
I happen to love artificial intelligence. It helps me every day to find solutions to my problems.
For my waning vision, even after cataract surgery, I bought a good scanner.
- Print my downloaded knitting pattern.
- Scan it at 300 D.P.I. - dots per inch.
- Open the 'picture' taken by the scanner in a photo manager with editing capabilities. I use Microsoft Paint for simple tasks.
- Resize the image to what you wish, making it smaller. For most knitting patterns, this gives me about 20 rows of knitting per portrait-layout page. In 'Paint' all I have to do is print in a portrait (or landscape) layout. I like approximately 3 rows to the inch.
- Now my pattern is large enough to color the squares, if desired, and can be seen easily from a distance when placed on my magnetic board.

Thursday, October 20, 2022
More Knitting Progress
I found a wonderful chart on Pinterest. When I went to the source, I could see it was partial - which means to me that it has been ripped off someone.
Regardless, I loved it and will not share it. But it brought to mind, I needed to play around with cables again.
Since I re-chart everything to compensate for my 'traumatic brain injury' I had to come up with a way to chart the cables in a way that gives me a little extra help. Cables were not on my keyboard for knitting symbols, so I must do them by hand.
This is the paper I came up with to make a 'key' - Please feel free to copy my template. It is PUBLIC, for free, as in, not selling anything.
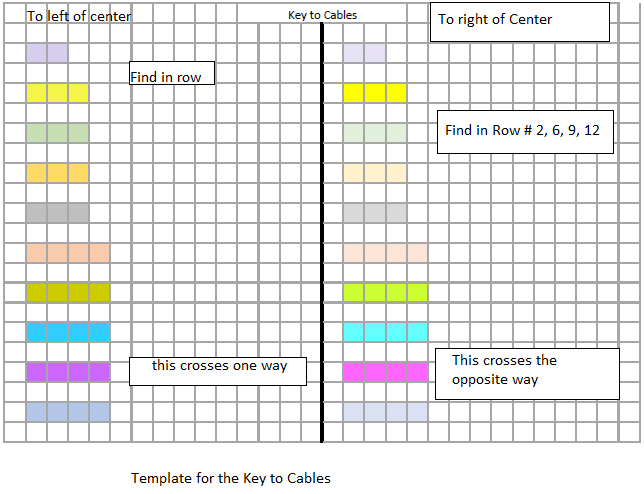
This was made in "Paint" the free graphic generating device, and Excel from Microsoft.
Sunday, October 9, 2022
Conclusions of exercise: Bruno in a Beaker
Next time -
I won't 'activate' the Inktense color with a wetting agent until I consider the work 'done.'
Layering color as you would with watercolors on paper may not work. Subsequent layers may not be permanent.
I will baste the fabric inside of the wooden frame, to allow it to lie flat.
I will "test" wash as many samples as necessary before working on the final piece.
Maybe I will do two samples, and wash one vigorously, and one washed gently, to test the permanence of the color.
If I give these mug rugs as gifts, I don't want them spoiled with a first laundering.
How do I know to take that into consideration?
Think black silk boxer shorts.
I may activate the Inktense with a liquid fabric medium, though it does add some stiffness to the fabric. I wonder: if I mixed it with water would it still work? Would it bleed?
Would gel outside the line of the painting help to control a hard line of color?
With every answer, there are more questions.
Bruno in A Beaker
What works . . .

Orignal drawing and tracing to yellow tracing paper for transferring to the fabric. The cup in the original drawing was from a shiny cup in my collection. It would not show a good value study because it was too shiny and reflective. I chose another cup, as seen in the tracing.

Photo reference for the cup.


First 'finish' before washing out the gel.

I didn't start from scratch, but really scrubbed, again, with a poly hot pad, or dishwashing scrubber (it came as a freebie with an order for the kitchen, not sure what it is.)

I re-did the coloring with the Inktense pencils, allowed it to sit overnight, and applied gel. It sat to dry overnight.
I applied white highlights in the eyes with acrylic fabric paint and added black toenails.
The cloth was removed from the frame when the paint was dry.
Following instructions on the acrylic paint box, I pressed it with my dry flat iron (no steam holes) on a polyester setting, for 3 minutes, moved the iron to cover the remainder of the image, and heat set for another 3 minutes. Instructions were to heat set for 3 to 5 minutes, so I felt safe. The number setting on my iron was a '2.' Instructions said to use 212° f, but I can't figure out how to measure the temperature of my iron.
After the fabric cooled, I put it in a tub with wool yarn shampoo - only because I felt it would be gentler than an alkaline detergent. Cotton would ordinarily call for synthrapol or hand-washing dish soap for washing.
Why? Wool Wash for animal fiber, and an alkaline detergent for vegetable fibers. It's a science thing.
It soaked with a few gentle swishes for at least 15 minutes, was rinsed, and hung outdoors under the canopy in the breeze. I put some clips on the lower edge to add a little weight.
Before I added clips on the bottom, I noticed the breeze had folded it up on itself.

Even at a distance, you can see the color remains brilliant. I am satisfied with an acceptable first piece. It will be finished as a 'mug rug' for Bruno's Mom, who lives in the Philippines.
Friday, October 7, 2022
Stretching Fabric for Painting
Update: This didn't work. I think the color needed to be pressed into the fibers/fabric better. I will still stretch the fabric but will reverse the front/back so the fabric can lay on a firm surface to apply the color.
Other possibilities:
1. Gel was not washed out completely
2. I used a rubber-type hot pad that had many little fingers, and scrubbed to get all the gel
out. It may have been too much scrubbing.
__________________________________________________________________
I use adjustable stretcher bars, but can't recall where I got them. I've had them for years.
Starting with a 10" x 10" square of Kona "snow" fabric, that has the main lines of the image traced to the fabric. Some areas have been traced with the outline pencil that came with my set, and other areas are traced with the Inktense color I will use, where I don't want a black outline.

Front of stretched fabric
A large piece of cloth is intended for stapling to the bars, to protect the background of the piece, with a window cut away. Before attaching my stretcher cloth to the bars, I stitch the project fabric to the cloth on the machine using the longest and widest zig-zag stitch my machine will handle.

Back Side