![]() |
| Clover Black Gold Needles |
On a predetermined course the needle journeys through the net, Over and under, around and back, over and over again (the under yet to come) A slender Silver Mouse in a Maze
Wednesday, June 16, 2021
From the Test Kitchen - Appliqué Needles
What to do when...
You must modify a pattern without changing the stitch count ~
-from the diary of
a brain damaged creative.
Sometimes, you just need to make
changes. Perhaps your creativity angel is poking you and the only way to get
her to stop is to pay attention and do as she demands.
But with knitting, you can really go off the rails making
changes when you don’t know what you’re doing. The main thing is stitch count.
If you have a stitch dictionary, you’ll notice that all the patterns have a set
stitch count. It may be “Multiple of 7 plus 4." When I see that, I know the
pattern is symmetrical, and that it takes 4 additional stitches to even things
out at the end of the row (or repeat.) The smaller the repeat of the stitch and
row count, the safer it is to modify: Stockinette stitch is 1 stitch (knit on right side) one row, and another stitch (purl on wrong side) on the next row when knitting flat. To further complicate things, if you are knitting circular every row is knit - making it easy to
modify. Garter stitch also lends itself to modifications, being 1 stitch (knit) on every row, but knitting circular you would knit one row, purl one row. A
border of 22 rows – each row with a different stitch count would be difficult,
if not impossible, to change unless the 'pattern' changes will match the main
body of the project. For example: your project ends with 3 major parts (right
side, back, left side) but the border pattern is a repeat of 8 plus some. Three
does not go into eight without having something left over. If the leftover is
not equal to the "plus some" of each row it won't work. As much as we'd like to,
there is no changing laws of physics to suit ourselves.
How can
I change a pattern without changing the stitch count?
Enlarging: Requirements
include having enough yarn. When you are satisfied that you do, you can
gradually move up to larger needles. There is a sweet spot when it comes to
needle size, yarn size and stitch size, so you will want to play around with
swatches first to make sure your choices will work.
Downsizing: This gets tricky
but is generally easier than enlarging a pattern. A long-sleeved top-down pullover
(jumper to my British friends) may be OK being cut off just below (or above)
the bust. The shawl may work with a different, but narrower border provided the
stitch count is compatible with the stitch count of the main part of it.
Again, you can change the gauge by
using a finer yarn and smaller needles. Swatching is necessary to know what
will work and what will not.
Felting or “fulling”: If you feel
really confident you can shrink the finished item. This is scary but could
conceivably work. Felting means to make felt while fulling is shrinking only a
little to make the fabric look fuller. Be aware when shrinking that nothing
really goes away – a shorter length/width means a thicker fabric. Note: It is possible that "fulling" was a historical term for blocking. Except woven items were fulled as well as knitted and knotted so that is debatable.
YIKES!
You can see you will not have enough yarn – the dye lot is not available (or yarn
was custom dyed) and you are on a deadline to finish this project. You are too
far into it to rip it out and start over.
Here is where it is helpful to have learned to analyze
patterns: Examine the pattern repeats, count stitches, count rows – try to find
where substituting another yarn or color will work. There are several options –
or things you wish to avoid.
Spotty color: A small
consistent color change may result in polka dots that really don't play well
with the over-all pattern. Small color changes may mean weaving in ends to the
point of adding weight to the over-all project that changes the “look” and
“drape.”
Stripes: Whole rows of color
change may result in stripes. The effect can be minimized by choosing the same
color that is one step up or down in value (lightness or darkness). The goal is
making it look intentional!
Borders: A contrasting border
might work. Consideration of color*, contrast** and harmony*** is essential to
giving the final project the look of being planned from the beginning. ***”Harmony”
means to pick up a color that is already present in the project, but not the
main color. **”Contrast” means a shade lighter or darker. *”Color” means
introducing an entirely new color that blends well with colors already in the
pattern. These design principles, noted by asterisks, are specific to this
article – there are more things to know about each one than is described here.
Please leave a comment if you found this helpful.
Monday, June 7, 2021
How to re-Write a Knitting Pattern for People Who Can't Read
How to set up a knitting
pattern in Excel
for people who cannot
read charts or written patterns.
This spreadsheet was created using Microsoft
Excel. Other programs may be similar, but different in some respects. Any similarity to a previously published pattern is coincidental.
Set up the spreadsheet with column width at 4.0
to 6.0 and height at 25 – 30 (whatever you are comfortable with.) The size of
the cells relates to the amount of information, and font size of the contents
of each cell. Cells should be big enough for the least amount of info that can
be understood and smallest font you can easily see.
Format the cells as "Text" so Excel
doesn't auto correct your entries.
Table 1 A pattern
that is not a pattern - only for illustration.
The
rows affected will turn green in the row count column, and grey across the
sheet.
Note the lifeline after End of row 1
The “hide” feature allows you to hide some
rows so you can place the row you are working on to sit just below the first
row – in this case, the number of stitches. You “unhide” the hidden rows when
you need to refer back to them, as you would when the pattern says, “repeat row
2.”
Column A shows the number of stitches you have at the beginning of the row and the end of the row, so you can count to check your accuracy. A pattern may have an even, equal number in the right and left sides and an odd number in the middle if the pattern is symmetrical. It may have that an odd number on each side and still be symmetrical. Look for a pattern within the pattern.
Inst - look for instructions on this line. I
merge cells above what the instructions refer to, then type the instruction
inside the merged cell. I may have to change the font to make it fit.
I put a wide, dark border around my set of 3
parts to each row.
When I complete 20 stitches, (less on a bad day)
or a pattern repeat, I place a marker.
I am never counting more than 20 at a time.
Column B shows the rows according to whether they are the right side
of a garment, the center, or the left side of a garment. The different
background colors of the 3 row indicate that the 3 rows group in the same
knitting row.
Each cell indicates what you do.
K, knit; P, purl; O, Yarn over - in a size 11 pt. or 12 pt. font
and p2tog in size
8 pt. font.
Increased stitches are shaded green, and only
those show up as a double wide cell in the case of working 2 stitches together.
“Make Ones” and “yarn overs” are shown as one stitch, because you don’t rely on
another stitch to make the increase.
Most patterns have a beginning (selvedge) a
middle (repeat) and an end (the other selvedge).
I only colored the background of the repeat,
with any stitches that lead to or from the repeat written out. In this case I
was writing a pattern for a “swatch” beginning with 16-11-16 stitches.
After the first few rows, I sometimes write out
the repeats. Your pattern may only need the “selvedge” “repeat” and “selvedge.”
How to “freeze” the top (number of stitches)
row: Select “View” in the tool bar and choose your options.
The Help feature in Excel provides more
information on View, Freezing Panes, and Splitting your screen. I use all these
features, and others. The tool bars have many options. It pays to take the time
to learn how to use Excel.
The dotted line around my illustration indicates
it is only a partial view of an Excel tool bar.
Getting to work:
Whenever
I see an asterisk (*) in my pattern, I know it means to repeat a section, so I
write it out in a part of my spreadsheet that is empty. As I write my pattern
in the spreadsheet, I am constantly moving the “Assets” (things I will copy and
paste) down the page.
Then I copy and paste it nearby (still not on a
row). I now have two of the repeat. One of them gets a colored
background, the other is left plain. This is done so I can copy and paste the
repeat as many times as I need – and still be able to see the original repeat
sequence. Even the most complex patterns are “repeats” of a given sequence of
stitches.
I may do the same with a short repeat placed in
brackets “[k1, p1] three times”.
Please send me a comment if you have anything to
add. This is in early stages of development so there may be changes later.
Abbreviations:
K Knit
P Purl
O Yarn Over,
making an increase
P2tog Purl 2 stitches
together, making a decrease
K2tog Knit 2 stitches
together making a decrease
Mr Make
1 Right
Ml Make
1 Left
[xx] Stitches within a bracket for a short repeat, often within a repeat.
P.S. When knitting, I found that a magnetic board
with a magnetic strip works well.
I also use a small square magnet to limit
what I see to just a few stitches.
Then after each portion I check my work.
Don’t bother notifying
me of mistakes in the content of the cells.
They have been made
deliberately to stress this is not a pattern.
Visit me at Elaine (Lainy) Rutledge on Ravelry
Friday, April 2, 2021
DBDC/x
DBDC/x = Diary of a Brain Damaged Creative in the Unknown
I was born with the cord wrapped around my neck. The doctors must have told my parents I would be brain damaged.
Heaven forbid they give them any hope for me.
If I wasn't brain damaged at birth, I was by the time I left home, with only what I could carry.
If you think me complaining, you are wrong.
Because I didn't see myself as smart, pretty, or having any value whatsoever, I tried to learn what I lacked. I learned to love learning as a hero loves his quest.
I've never completed the task, and have never fit in.
However, accepting that fact, I did whatever necessary to survive and be happy.
In my 70s, I've achieved that blissful state.
But then, I'm a slow learner.
Friday, March 26, 2021
How to ply yarn
How to “ply” yarn:
Why would you want to?
- 3 different shades of the same color plied together
will produce a yarn with subtle depth.
2. Yarn is weak and breaks easily.
3. Pattern calls for worsted weight (10 ply)
and all you have is 2 ply.
4. You want to blend
fibers.
Tools:
DPNs in wood or bamboo
(DPN = Double pointed needle)
Whittling knife
Yarn
Optional: a wooden bead or wheel on one
end of each DPN.
Instructions:
Carve a notch in the end of a DPN.
Attach yarn to DPN with a half hitch knot.
Spin the DPN so the yarn winds tighter – much tighter – til it
curls up on itself.
Holding yarn so it doesn’t curl up on itself, undo the hitch
knot and wind the yarn around the spindle – (DPN).
With two or more full spindles in clamps so they will turn only
when you pull on them, tie the ends together on another spindle.
Wind the spindle the opposite direction to spin the plies
together – or let them relax and spin themselves, a little at a time.
Tuesday, March 23, 2021
Circular Swatch Knitting
Circular Stockinette Swatch
© Elaine Rutledge, 2021. Permission granted to reprint for
educational purposes. Any reprint for profit will be prosecuted.
Yarn: Wool of Andes Worsted, cotton *fence yarn
Needle: size 7
plastic circular
Gauge 19 st = 4”
CO 29: – Knot *fencing yarn to tail at end of cast-on:
19 pattern
stitches and 10 (5 x 2) selvedge stitches.
Work 1 row, slide work to the other end creating a float and
secure with a clove hitch. Tie the floating end to the fence*. remove the clove
hitch, knit a few stitches, and cut the float.
Norah’s 5 Stitch Selvedges***:
1st Row: Sl-2 (purlwise) YIB, P1, K1, P1 work
in pattern to last 5 st, P1, K1, P1, K2
2nd Row: Sl-2 (purlwise) YIF, K3, work to last
5, K5.
Repeat the row sequence.
If you examine your work
at the end of each row, you can
fix mistakes sooner.
“A stitch in time, saves 9”
*Fencing yarn: Tie one
at each end to ‘fence in’ your work. Cotton fence on wool will not
‘felt’, and vice-versa.
loose. The floating yarn must be
kept taut while tying the fence knot.
If you use 2 different colored
fence yarns, you will always know which is the “right” side. Some patterns have
no right or wrong side when finished. I sometimes let ‘habit’ take over and
turn the work.
Work foundation row and 4 rows of your choice for a hem:
It should be at least a 2 stitch, 2 row opposing sequence** to balance the
stitches. If the hem stitch is not the same gauge as the stitch you are
swatching, add or decrease stitches after, and before the hems to adjust for the
difference.
The exception: working a swatch at least 8” square,
measuring in 3 places, and taking an average count will compensate for the
discrepancy.
**Opposing sequence: a rhythm of knits and purls that
will lay flat without curling or distortion. For example: (1) garter, (2) moss
stitch. NOT good: Stockinette or ribbing.
Work selvedges, then knit each row for circ stockinette.
***Norah’s 5 Stitch Selvedge might work for a hem. Adapted
for circular knitting from The Knitting Cables Sourcebook, by Norah Gaughan.
Back Side of work. Take care to keep floats loose.
Otherwise, your corner will curve like mine did.
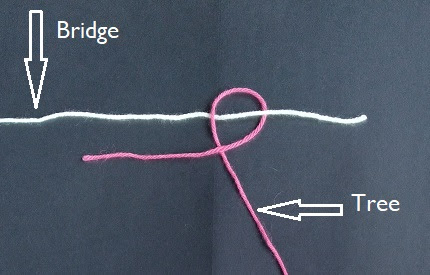
First Clove Hitch fence knot step: With the bridge held taut
jump over the bridge and run in front of the tree.
Also called a Half
Hitch
To do a double half hitch, do it again.
Subsequent Clove Hitch step: then jump under
the bridge and go into the hole.
The first step is made in one direction
and the second step in the opposite direction.)
Notes on the side fences:
Use contrasting yarn: if knitting wool, use cotton,
or vice versa. Wool on wool will felt, and the float
will not slide easily in the knot.
The whole idea is to be able to slide the floats
along the hitch to adjust the tension when finished.
The tail (illustrated as a ‘bridge’) must be kept taut
when tightening the knot, or it will become entangled in the
knot, and will not slide.
I turn my work to the back side to tie to the fence. It reminds
me to work only on the front.
Deepest gratitude to
Norah Gaughan,
author of Knitted
Cables Sourcebook
For sharing with me her
5 Stitch Selvedge stitch sequence.
Saturday, January 9, 2021
Back to Appliqué Basics
After years of trying all the new fangled ways to do appliqué, I am re-learning the "right" way. Practice, practice, practice.
The project is a composition of two different patterns - the center medallion is:
Tapestry, by Urban Elementz,
and the surrounding blocks are:
Fleur by Bobbie Ashley.
The Tapestry pattern is perfect for new and old beginners - one shape,
many different sizes and placements.
I remembered a teacher once saying: List the things you think you know and learn that first!
Here is a photo of me re-learning how to take a simple stitch:
The method I am using reminds me of the way Ami Simms works.She accomplishes the same thing with an entirely different approach.I love her website.
By holding the work this way, with the thumb on the unit, and the foundation rolling
over the index finger you can see into the space to stitch.
I am using silk thread, 100 wt.
and have it tied in a knot to the needle.
The back basted appliqué design on the foundation stays in place.
I stitch next to it, being carefully to not stitch into it
It's easy to remove if I do, but why work unnecessarily?
Each stitch goes only through one layer of fabric, and the stitches line up.
The needle goes into the fabric next to where it came out of the unit.
When the thread is pulled taut, everything falls into place, like magic.
Notice my edge is not creased. I don't want to accidently crease in a tuck
under the unit that will never lay right.