
The Naked Nico
A delightful pattern from
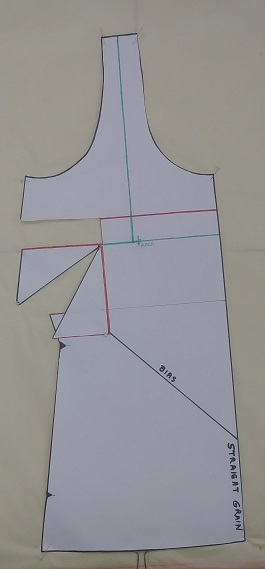
This technical rendition of the front of the Nico pattern
shows how the darts are on the diagonal, starting at the bust
and ending just above the waist.
The diagonal front dart is very flattering in most cases.
However, I don't like ironing.
When my dress comes from the
dryer, the darts are puckered, because they are cut on
neither the straight grain, nor the
true bias. Only ironing or heavy handed
finger pressing smooths them out.
To fix the problem, I want my darts on the true bias,
meaning they are balanced, and the darts legs
(the dart seam-line)
are both the same angle.
I also have other problems - such as a large bra cup size,
and saggy boobs. It happens at my age. The Saggy
Boob Club has a lot of members, and we don't
want a spotlight on it. When that particular
characteristic blends into the whole body image,
we can maintain the dignity only achieved
by reaching a beautiful old age.
But here, I will address one thing at a time:
First, move the dart. To do that, we must find
where the dart needs to be.
The singular purpose of a dart is to provide shaping
to allow fitting the highest point.
Therefore that point is referred to as the Apex,
and is often, not always, the location of the nipple.
It is the highest point of the bust
whether shaped like a cone
or a balloon.
That point established, darts
on the front of a garment from the
neck to the waist all radiate from those 2 points:
The high point of each breast, the Apex.
I measured with the tape on my bra strap,
from my shoulder to my apex: 11.5" and drew
a line perpendicular to the center front.
Then I measured the distance between
the apex of each breast, the apex width: 9"
and marked the half pattern 4.5" from center front.
The dart point lies between the side seam and the apex.
That point is addressed in the next post.
Step one: Using 20 lb Bond Plotter Paper
(sold through Amazon)
I traced my one half the pattern
(from center front), and drew the dart seam lines,
removed all seam allowance, and cut it out, removing
the paper within the dart (the dart gap).

Step 2: Isolate the placement of the dart,
and indicate the correct placement.

The red lines have the dart in a box.
Where the green horizontal line meets
the green vertical line is within one-fourth
inch of my personal bust apex.
Horizontal lines have been drawn
90 degrees from the center front.
Vertical lines are parallel to the center front.
Step 3: Cut out the box containing the original
dart and shift it down till the red horizontal
line meets the green horizontal line.
I have extended my green apex line to make it easier to line up.
The dart has shifted down, but the box remains parallel
to the center front.
Step 4: Tape the dart box in position, and tape a paper scrap
in the open space above the dart. Draw fold line #1
from the dart point to the hem. Fold on that line.

Step 5: With pattern folded on line #1, close the dart,
and crease the pattern where it folds to lie flat - #2.
It has been drawn only to indicate the approximate location.

This illustrates how the pattern looks with the dart closed,
and the seam line corrected.
Step 6: Open the pattern and trace it again on a clean sheet of paper
that is wide enough to draw both halves, to make
a complete front pattern for laying on the bias.
You only need the seam lines, notches and open dart
if lowering the dart was all you needed.
Now I know where I want the dart - I will move it from
the diagonal to be centered on the apex line.
No comments:
Post a Comment